
Mesh approximator and surface displacement
The meshrelief include file contains several macros for creating detailed mesh versions of normal POV-Ray objects, and applying surface displacement such as weathering to them.
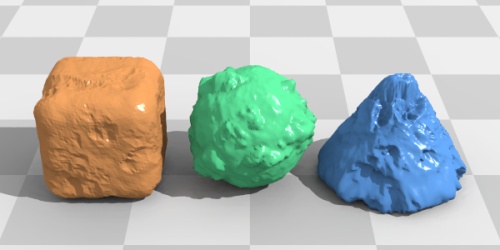
This image illustrates the principle for three simple examples. Here is the scene file for this image: meshrelief_demo.pov.
Download the mesh relief include file: meshrelief.inc
Motivation
When building realistic stone structures in POV-Ray, there are several
approaches that can be taken. Brick walls can be simulated using the
bricks pattern, but the pattern looks too regular and flat. Layered
textures, turbulence and surface normals can significantly improve the
situation, and may be adequate in some scenes, but normals take a long
time to render when used in conjunction with radiosity, and the brickwork
will still look too regular. The ideal solution is to actually build
structures from individual bricks, preferably using macros to automate the
task.
Using simple boxes or rounded boxes will vastly improve the look, and using surface normals or even isosurfaces to give the bricks some relief texture will look even better. However, isosurfaces can be incredibly slow to render, and even using plain boxes will consume a large quantity of memory in complex scenes. The solution is to use triangle mesh bricks, which, despite occupying more memory individually than an equivalent box or isosurface, can be copied at almost no extra memory cost, and render very fast.
The macros
These macros allow simple shapes to be converted to meshes, and can deform
the surfaces to provide a weathered look in a similar manner to an
isosurface. The weathering is based on a pigment pattern, enabling all the
features of procedural texturing to control the surface displacement.
Using an identical pigment with a suitable color_map can match colour to
the weathering. Since very detailed meshes can take a long time to parse,
there is also the option of saving the mesh in an .inc file that can be
#included later, and parse much more quickly.
The following macros are defined:
Rounded_Wedge
ballpoint(vang, ang, rad)
MeshShape(obj, inobj, centr, res, pig, dep, smoothed, saving, name)
Weathered_Box
Weathered_Cylinder
Weathered_Cone
Weathered_Super
Weathered_Spheroid
Weathered_Wedge
Rounded_Wedge() is a triangular/trapezoidal prism with rounded edges - a useful brick shape. It is defined as a merge, in a similar way to Round_Box in shapes.inc. See the macro's comments for a full description.
The ballpoint() macro is simply a polar coordinate generator (vang = angle from y-axis, ang = ang around y-axis, rad = distance of point from origin).
MeshShape() does all the hard work of building the mesh. It takes the
following parameters:
obj = object identifier: object to be converted
inobj = object identifier: inner object to define vertex perturbation
directions (see below)
centr = vector: centre of object
res = integer: resolution of
mesh
pig = pigment identifier: for weathering function
dep = float: depth of weathering
smoothed = yes/no
saving = yes/no
name = string/string identifier: name for saved include file and mesh2
within that file
Weathered_x() builds weathered objects of specific types by first declaring suitable target objects, then passing them on to the MeshShape macro. In each case, 'edge' defines the radius of curvature for edges, 'dep' defines the depth of weathering (using a -ve value makes the weathering stick up as bumps), 'smoothed' and 'saving' are yes/no values, and 'name' is a string literal or identifier giving the saved mesh a name/filename. For detailed descriptions of the required parameters, see the macro definitions in the include file.
If you just want to use the predefined simple block shapes, just call Weathered_x() with your options and away you go. However, if you want to weather a different shape, or optimise the inner normal shape for the predefined shapes (see below), you will need to use MeshShape() directly. The macro requires a little explanation to use properly.
Detailed description
The macro works by shooting rays from the centre of the target object,
recording vertices where these rays strike the surface of the target
object, then applying the weathering pigment function as a displacement to
the vertices. The resulting mesh is built from these vertices. The rays
are shot in a spherical pattern, so vertices will be closer together at
the poles of the shape and further apart at the equator. Since the rays
are shot outwards, the target shape must be a completely filled shape -
use merges, not unions, or the results can be unpredictable. Additionally,
the entire surface of the object must be visible from the centre point -
any part of the surface that is not will be missing from the final mesh.
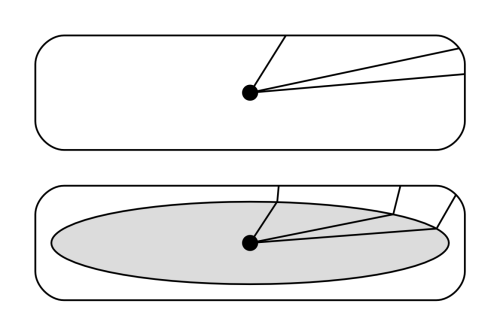
The direction for the vertex displacement is not the target shape's local normal, because in some cases this will mangle the result - think of points at a distance from a corner that is smaller than the specified displacement. Nor is the displacement always towards the centre of the object - for wide and flat or tall and thin objects this will look strange. Instead, a smaller inner object is specified that approximately matches the target object in shape, and two rays are fired for every vertex. The first ray finds a point on the inner object, and the second ray is fired from this point, along the local normal (see diagram). This means that for long or flat target objects, the direction of displacement is always approximately normal to the surface, and only towards the centre for target objects that are equally-sized in all directions (e.g. cubes and spheres). For the predefined Weathered_x() macros, this object is a simple spheroid (look at the code to see for yourself). However, for some objects a less general approach may be required, so you can supply a more optimal object directly.
In all cases, an inside_vector is added to the mesh, so they can be used in CSG. Additionally, they are completely closed volumes and so will also work as media containers (you will need to add the hollow keyword).
Tips for usage
When building brick structures, it is usually sufficient to use a small
array of different meshes, containing no more than 10 bricks in total,
each with randomly translated weathering pigments and slightly different
colours. Bricks can be picked randomly from this array when placed.
Randomly rotating the bricks by 180 degrees on different axes (or random
multiples of 90 degrees if the cross-section is square) can also increase
the apparent number of different bricks in the structure.
This image shows how a small number of block meshes can be used to good effect. Believe it or not, there are only six building block meshes in this image (not counting the statue and pedestal): column, column base ring, column base (which also doubles as the paving), support thin, support thick, and brick.
Using heavily deformed spheres or isosurfaces as the base objects can yield very realistic boulder or pebble shapes. Random rotation prior to scaling can make a single rock shape go a very long way, and using many copies of a single rock to fill an existing object (place them with the trace() function) can make much more realistic rocky shapes than trying to make the whole object as a single mesh. Such compound rocks or landscapes also render faster than heightfields or isosurfaces.
Don't be afraid to use high-res meshes if individual triangles are visible - I have used meshes with resolutions of 600 and higher to good effect. It is easy to use low-res versions for test renders before cranking the triangle count up for a final render.