Exile
Exile is the seminal action adventure game for the BBC Micro, created by Peter Irvin and Jeremy Smith and released in 1988. A masterpiece of compact and elegant programming, it is one of the earliest examples of a non-linear open world, and has a strong claim for the first ever physics engine used both for effects and game mechanics.
This document is an attempt at a comprehensive guide to playing Exile in the spirit intended by the game's authors. Every task in the game has at least one specific 'intended' solution that does not rely on luck or glitches. Most tasks concern collecting items, or gaining access to areas of the map, and often there is no set order to doing things. I have therefore grouped tasks and descriptions by category rather than construct a linear walkthrough.
Despite the non-linear nature of the game, there is a broad general progression. Many puzzles are clearly designed to exploit certain items or weapons, so I have cross-referenced solutions for ease of browsing. I have resorted to detailed walkthroughs in only two places: destroying the Rune Portal, which requires a complex sequence to obtain the necessary items, and the endgame, which benefits from a certain amount of preparation.
Contents
Fair play
As mentioned previously, this guide is an attempt to play the game by the rules. I will not be relying on luck, glitches, or hiding from enemies by moving the viewport to the player's advantage. I will, however, mention some shortcuts or unintended solutions as points of interest or optional alternatives.
See also
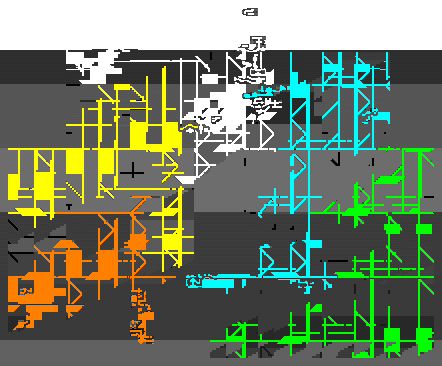
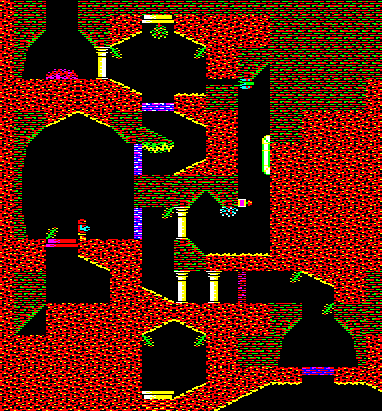
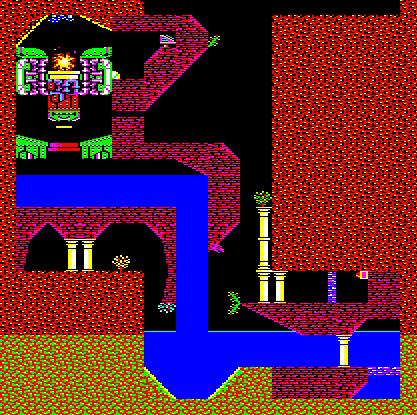
While reading this document, you will find it useful to refer to a map. I have included a few images where I felt descriptions were getting confusing, and a small map to illustrate my zone classifications. I have also prepared this annotated map, to which I shall refer in my descriptions.
For a nearly definitive reference, I recommend Bill Carr's map, which is basically 1:1 (only 'nearly' definitive because there are some very minor deviations from the game as played, and one of the clawed robots is omitted which gave me a nasty shock).
I also recommend watching LordTriax's playthrough on YouTube. Although his solutions often differ from mine, his skill in flying and combat are awesome to watch, and he makes the finale look easy!
Goals
Broadly speaking, all you need to do to complete Exile is return to your ship with your purloined destinator. However, you also get game points for rescuing the captives and making kills, and there are many items to collect, including suit upgrades, weapons and portable objects.
An approximate recipe might go something like this:
Get the RCD and the green key
Get the pistol
Get the red key
Get the icer
Get the yellow and cyan keys, the power pods and the boulder
Get the jetpack booster, the first whistle and power pods
Go down the Windy Passage to get the red/magenta key and the second whistle
Get the protection suit
Get robot Chatter and tank up on power
Go down to the east of the Windy Passage to get the radiation immunity pill and two Coronium boulders
Destroy the Rune Portal using the Coronium boulders
Get the plasma gun and the fire immunity device
Get the blaster and the mushroom immunity pill
Get the cannon RCD
Approach Triax's lair from above and clear the enemies down to the entrance
Get the blue/green key
Get the captives out and set the teleporters necessary for the journey back to the ship
Take the cannon down to the lab, through to Triax's lair and gain access to the maggot machine
Flood the maggot machine and set off the earthquake
Get the captives back to the ship using the rising floodwater
Return to Triax's lair for the destinator and get the hell out!
Many of these goals can be achieved in a different order, especially early in the game.
Items
 Flask
Flask
The flask, when filled with water, is useful for putting fires out. There are at least three places where this is important to gain access to a location before the fire immunity device is obtained. The flask is located in a small room to the lower west of the main cavern (A18), accessible from the tunnel next the the imp nest (A16).
The tile door to the flask room is open when you arrive; the flask is against the opposite wall. As soon as you start back towards the door, it will close and the wasp nest on the ceiling will wake up. Quickly fly back across the room and under the closing door. Alternatively, you can remember your position outside the room, throw the flask under the closing door as soon as you pick it up, then teleport out to collect it before the wasps get you.
When moving around with the filled flask, be careful not to bump into things or change direction too suddenly, or the water will spill out.
 RCD
RCD
The most efficient way to get through the various metal doors around the caves is to open them. Since most of them are locked, you will need the RCD (Remote Control Device) and the passkey for that door. The RCD also allows you to activate and deactivate some of the teleporters.
The RCD is in a firepit at the bottom of the main cavern, below a tile door and an oval-shaped shaft (A17) to the west of the imp nest (A16). To get to it, you will need to put the fire out, requiring the flask. To the west of the RCD pit there is a vertical shaft in the green rock with a well at the bottom. Drop into the water holding the flask to fill it. As soon as you enter the RCD pit, the tile door will close. Remember your position on the tile door over the fire, and leave the full flask there. Fly back around to the east, to the columns on the other side of the wall from the fire - there is an invisible trigger here that opens the tile door. The flask should fall onto the fire, putting it out. Teleport back and drop down to collect the RCD - once you pass through the door it will stay open.
Doorkeys
There are five doorkeys scattered around the upper part of the map; green/red, red/green, yellow/red, cyan/green, and red/magenta. Obtaining these keys, together with the RCD, permits access to most of the human-constructed areas in the main cavern and immediately to the east. Crucially, the red/magenta key gives access to robot Chatter. There is additionally a sixth key in one of the lower caverns (blue/green), which operates the remaining inactive teleporters.
 Green/red key
This is the easiest key to collect. Directly above the RCD pit in the main cavern, there is a vertical shaft in the ceiling that goes past a wasp nest in an adjacent cave. At the top of the shaft, to the east and diagonally downwards, there is another wasp nest, and the green/red key is underneath it (A10). The easiest way to get the key is just to charge straight down past the nest before the wasps notice you, collect the key and teleport out.
This key controls green doors with a red lock: the grenade room in the Pericles (A3), the door into the caves below the Pericles (A4), the door by the pistol (A15), and the first door to the jetpack booster room (A14).
 Red/green key
This key is best collected after obtaining the pistol, because of the two white birds in the passage that leads to it (A11). Alternatively, if you can lure them back into the main cavern, you can lead them into the deathball turret room on the eastern side. Either way, go up the vertical shaft above the well to the west of the main cavern, then down the passage to the west. The end of the passage opens out into the cavern containing the Rune Portal (A12). There are five white birds in a nest near the bottom (A13), next to a teleporter; if you're not yet equipped to fight them then stay near the ceiling. In the top western corner of the cavern is an opening to the surface. The red/green key is on the ground outside, a little to the east. Remember position in the cavern, then fly out into the wind to get the key. If you miss it, teleport back and try again.
This key controls red doors with a green lock: there's just one, the door at the bottom of the main entrance shaft next to the hoverball nest (A5).
 Yellow/red key
This key is by the Windy Passage, on the ceiling next to the teleporter (B1). Once you get to this area, collecting it is straightforward. Assuming you have the pistol by this point, kill the hoverballs through the teleporter beam, then fly up the diagonal and down the left wall of the Windy Passage to get to the other side of the teleporter.
This key controls yellow doors with a red lock: the inner door to the jetpack booster room, and the second door just above it to the subsidiary room.
 Cyan/green key
This key is in the complex of caves in the upper eastern side of the map, on the other side of the Windy Passage. You will need the flask to retrieve it. To fill the flask, go east along the passage at the yellow/green rock boundary and take the last shaft up by the red nest (B8). There is a well in the cave at the top (B11).
From the well, go back and then up the wide shaft all the way to the top, then over the passage with the blue mushrooms and down the narrow shaft to the east. At the bottom is a tile door with a wasp nest under it, and a narrow crack leading to a fire and a switch (B10). Below the fire is a hidden passage down to another tile door, behind which is the cyan/green key, a boulder, and another switch. The first switch temporarily opens both doors, and the second switch unlocks them. The wasp nest can be killed with the pistol if necessary, by standing next to the tile door and aiming down through the corner. A single wasp can spoil your day here so it's not a bad idea.
To put the fire out, you must lie down, push the filled flask through the crack and throw it down onto the fire. This is easier than it sounds; if the flask gets stuck just inside the crack then use the pistol to push it towards the fire. If you fail, leaving the empty flask on the other side of the crack, you'll probably have to reload because getting it back will be all but impossible while the fire is still burning.
Once the fire is out, lie down and fire the pistol at the switch through the crack; the tile door over the wasp nest will open and push you through. To get through the second tile door, throw the flask at the switch from just above the hidden passage, then either drop down or teleport to get to the door before it closes. Collect the key and hit the lower switch to unlock the doors.
This key controls cyan doors with a green lock: the door to the turret trap room near the Windy Passage (B2), the door to the upper eastern caves (B6), and the door further east with power pods behind it (B7).
 Red/magenta key
This key is at the bottom of the Windy Passage, to the west (B19).
Descend the Windy Passage to the bottom. The first cavern to the west contains a piranha nest next to a suck nest with a switch nearby (B17), and a push nest at the far end in front of a tile door (B18). The push nest is activated by the presence of the piranhas, so kill them with the pistol. To the east, on the other side of the Windy Passage, is another piranha nest and another switch (B16), which unlocks the push nest tile door.
On the other side of the tile door is a homing fireball and a sticky nest in a narrow passage. Lure the fireball out and extinguish it in the water. This can be tricky; remember in the deep section in case you get killed, and thrust to stay underwater. It may extinguish itself trying to get to you, or you may have to pop up and then dive as it attacks you. Once the fireball is gone, boost through the sticky nest into the next cave. The key is at the far end, behind an imp nest above the water. You will need to boost through a crack against the ceiling, best done lying on your back.
This key controls red doors with a magenta lock: the door to the lab (B3), the door at the back of the deathball turret room off the main cavern (A19), and the door behind the icer turret at the bottom of the main cavern (A21). It also controls the teleporters by the icer.
 Blue/green key
This key is in the lower western caves, not far from where the captives are kept, next to a red imp nest (E3). It is best to wait until near the end of the game to obtain this key, because the intended route is via the entrance to Triax's lair. This area needs clearing of enemies, and a pair of tile doors, which you will need to do during the first part of the endgame.
It is possible to get past the suck nest (E2) by boosting past it, but this probably counts as a visibility exploit. Even using this method, you will still need the mushroom immunity pill to get through the mushrooms without falling into the nest in a daze.
This final key doesn't actually open any doors, but it does operate the remaining teleporters: the teleporter in the Pericles cannon room (A2), the teleporter in the lab behind the tile door (B4), and the teleporter near Triax's lair (E7).
 Power pods
Early in the game, power for weapons and the jetpack is in very short supply. There are a number of power pods to be found throughout the caves. Once disturbed they must be picked up and stored as quickly as possible, because they start to blink and eventually burn up.
1) The imps in the main cavern (A16) will throw a power pod at you after being fed a wasp; up to four are available.
2) There is a single pod on the ceiling by the blue robot guarding the entrance to the jetpack booster room (A14).
3) There is a single pod in the room adjoining the jetpack booster room, above a white bird nest (A20).
4) Two piles of pods are dispensed when pressing the switch for the teleporter in the jetpack booster room. They fall out of the yellow pot on the ceiling.
5) A pile of pods can be found behind a cyan door on the eastern side of the top of the Windy Passage (B7). You can get them before obtaining the cyan/green key; fly under the door before it closes, and disturb the yellow pot to dispense them.
6) Once robot Chatter has been obtained (B5), an indefinite supply of power pods is at your disposal with a little effort.
Before finding the caches above, you will need to conserve power to a certain extent; this just means not getting too trigger-happy. You should only need to blast away when dealing with white birds or robots, and if you're careful, not even then. Also keep in mind that hoverballs and piranhas can be killed by single pistol shots. Once you have access to Chatter and can fill up, you should be set for the rest of the game. I only filled up twice on my playthrough, and the second wasn't strictly necessary.
 Jetpack booster
The jetpack booster is essential; without it, you cannot squeeze through cracks or descend the Windy Passage. It also gives you an edge when evading flying enemies.
It is located in a room off the upper east side of the main cavern (A20), behind two doors with a robot between them (A14). The first door is unlocked; the second requires the yellow/red key to unlock. Open the first door and retreat while the robot follows you out. He fires homing missiles, so watch out. He can be killed with grenades, but the simplest course of action is to push him off the ledge. Remember on the slope by the door, then teleport in behind him as he climbs the slope and shoot him off the ledge with the icer. He'll end up in the bottom cave by the icer turret (A21), and can be finished off later when you have heavier weaponry.
The booster room is guarded by a deathball turret on the floor. If the turret fires at you, the blast will probably knock the booster off its ledge. It may bounce down the slope into the passage, in which case you can collect it easily. However, it might end up behind the turret, or even below it in the switch room. The turret can be killed by flying right up to it so that when it fires, it destroys itself, but this is quite unsatisfactory and not always reliable. A much better method is to simply turn the turret off. This can be done with the switch in the room below, which also turns off the teleporter and the other deathball turret guarding the first whistle (A19).
To access the switch, you will also need the cyan key. Make sure the yellow door to the booster room is unlocked. Go up to the icer room, set the teleporters to the Windy Passage area, then throw a grenade into the right-hand teleporter to kill the turret in the room beyond (B2). Follow it through, unlock the cyan door and head up past the whistle cave to the other side of the crack below the booster room. There is a nest of hoverballs just by the crack; kill them with the pistol.
Option one: push, throw or shoot Fluffy through the crack, then go round underneath and make some noise so he jumps around a bit and hits the switch. Personally I found this method ludicrously tricky - Fluffy doesn't easily go through the crack and tends to come straight back to you. He also does not cooperate with the switch, and I even lost him through the teleporter once.
Option two: throw the RCD through the crack, and shoot it with the pistol so it bounces into the switch. I found this far easier than using Fluffy - lie down by the crack, get the RCD up against the wall below the switch, then try to get bullets to explode next to it to knock it upwards.
Once the turrets are deactivated, go back to the passage from the main cavern, enter the booster room and collect the booster. Several power pods will have been wasted when the switch was hit, but most of them will still be available. Don't forget to turn off the turrets again before you leave!
 Robot control whistles
There are two 'whistles' that are used to control robot Chatter. The first is below the deathball turret in a room on the east side of the main cavern (A19), behind a crack. The second is in a small cave complex a short distance down the Windy Passage (B14).
To get the first whistle, you will need the jetpack booster to get through the crack. You also need to turn off the turret using the switch below the booster room; if you collected the booster by the 'proper' method this should already be done.
To get the second whistle, you must descend the Windy Passage a short distance, and take the first tunnel to the west (B13). Leave the boulder at the end of this passage and remember here in case you get killed. Go down the diagonal tunnel and into a wide vertical shaft. The tunnel on the other side of the shaft leads to an imp nest behind a tile door, and the whistle is behind another tile door immediately above the tunnel. When you approach the door, the imps will come out and open both tile doors as they move around. Quickly fly round and through the other door to collect the whistle.
Weapons
 Pistol
The pistol is in a small room in the middle of the main cavern, behind a locked green/red door and guarded by a flying robot (A15). The door can be blown with a grenade (drop it on the tiny ledge in front of the door) or unlocked using the RCD with the green/red key, both of which are nearby.
The robot will come after you on sight, but it is simple to evade him and collect the pistol. If you're careful, you can kill him with a grenade before he sees you. You can also stun him with the pistol, then use a grenade, or lead him into the deathball turret room on the other side of the main cavern (A19).
 Icer
Icer
The icer, along with the protection suit, is in the area next to the cave entrance under the Pericles (A6), and both are clearly visible on the way into the main cavern. Once you have the pistol, go down to the bottom of the entrance shaft and kill the hoverballs (A5). The red/green door can be opened with the RCD or destroyed with a grenade. The pink robot beyond the door can also be killed with a grenade, or pushed off the edge to the floor below with the pistol.
Once the robot is out of the way, fly across the room to the pink chest in the corner (A7). Move it away from the wall by standing on it, back to the wall, and firing the pistol down and to the left. Below it is a hidden passage to a larger room beyond, leading to a pair of teleporters below the icer. There are hidden cavities below each teleporter; the right one contains a flying robot, the left a nest of hoverballs.
The left and right teleporters lead to the cannon room on the Pericles (A2), and the long passage to the west that leads to the Rune Portal (A11). The switch near the right-hand teleporter changes their destinations to the Windy Passage complex (B1), and a closed-room turret deathtrap nearby (B2). The switch can be operated by shooting it with the pistol through the teleporter.
Standing next to the left teleporter, aim the pistol up at the icer and shoot it off its ledge. Then shoot it into one of the teleporters, follow it and collect it.
 Protection suit
The protection suit is in a small room above the icer, guarded by a grenade turret. You will need the red/magenta key to deactivate the teleporters, then you can either goad the turret into blowing the suit off the ledge, or charge straight up and collect it directly before teleporting out.
It's also possible to goad the turret by firing the pistol through the crack at the bottom of the magenta door in the entrance shaft. The protection suit will be knocked down to the bottom, and can then be collected in the same manner as the icer. This allows it to be gained before the red/magenta key, but is probably questionable from a fair play perspective.
 Plasma gun
The plasma gun is in the western caves below the Rune Portal. It is located at the end of a reverse L-shaped tunnel at the bottom of the cavern with the invisible birds, behind a gargoyle that shoots lightning up the entrance shaft (D2). To get to this cavern, you will need to either kill one of the invisible bird nests (D1), or go past the homing fireballs to the upper east of this area (D5). You will also need to deal with a clawed robot that sits just down the neighbouring diagonal passage.
To collect the plasma gun, hover at the top of the entrance shaft with your back touching the west wall, and drop the RCD. It should land on the gargoyle's nose and block the lightning. Now you can drop down against the wall and quickly walk down the passage away from the gargoyle. Once you have the plasma gun, the gargoyle can be destroyed with several shots.
Alternatively, you can bring Chatter along, deactivate him, and push him down onto the gargoyle. Now if you reactivate him, he will attack the gargoyle. You can help him to destroy it, then collect the plasma gun at your leisure.
 Blaster
The blaster is in the third windy cavern in the western caves below the Rune Portal. Go down past the fireball gargoyle (D6), take the passage to the west, down into the second windy cavern, then across to the top western corner past the cyan clawed robot (D7). The next two shafts both lead to the blaster cavern.
The blaster is blowing around in this cavern. On the ceiling to the immediate west of the first shaft, there is a suck nest next to a wasp nest (D8). The suck nest is activated by wasps, so as soon as you arrive wasps start emerging and get annihilated by the suck nest in a continuous stream. The blaster will probably get sucked in too, but even if it doesn't, you'll have to deal with the suck nest to proceed. It is easy to destroy the wasp nest using the plasma gun, or even the icer, and the suck nest should deactivate. It is then a simple matter to track down and collect the blaster.
 Alien weapon
The alien weapon does not attach to your spacesuit; it must be held and fired like an RCD. It is basically a handheld version of the plasma gun, but it doesn't use up energy and is available much earlier in the game. It is therefore incredibly useful when facing enemies too strong for the icer. It is, however, destructible, so is not recommended for proper firefights or close up contact.
It can be obtained from either of two imp nests in exchange for food. The cyan imps halfway down the Windy Passage (B14) may be given blue mushroom fruit, or the blue imps east of the bottom of the Windy Passage (C9) may be given piranhas. In each case, when the bribed imp returns to its nest it will drop the weapon.
 Grenades
Until you start collecting guns, grenades are the only offensive weapon available to you. There are seven scattered around the surface and main cavern area:
- On the surface under a bush to the east of the Pericles
- On the Pericles, next to the cannon (A2)
- On the Pericles, behind a green/red door (A3)
- On a wall under a wasp nest in the cave to the west of the entrance to the main cavern (A9)
- On a wall above a white bird nest just above the Rune Portal (A13)
- Embedded in the corner of the floor just in front of the icer turret at the bottom of the main cavern (A21)
An unlimited supply can be harvested from the turret guarding the protection suit, as long as it doesn't accidentally destroy itself. There are also two varieties of imp that can be persuaded to give you grenades, although they are almost impossible to successfully bribe; the red and yellow imps (D3, E3 and E11) will give one in exchange for a white bird, and the red and cyan imps (above D9 and east of D12) in exchange for a red bird.
Grenades are powerful, remaining useful for most of the game, and their effectiveness can be increased by using several at once.
Immunity
There are three items that give immunity to the main passive hazards of radiation, fire and mushrooms. The radiation immunity pill allows you to handle Coronium crystals or boulders without harm. The fire immunity device makes you impervious to fire, including plasma balls, homing fireballs and burning enemies or power pods. The mushroom immunity pill nullifies the effects of mushrooms, both the blue mushroom jetpack clogging and the red mushroom daze.
 Radiation
The radiation immunity pill is in the flooded caves to the lower east, below the bottom of the Windy Passage (C13). Getting to it requires either a Coronium boulder, or the big fish. Coronium boulders are radioactive and will kill you until you have the pill, but water stops the radiation, so you can use the boulder in the side passage just below the pill (C12). The big fish lives in a nest halfway down the wide vertical shaft on the other side of the green frogmen (C10), but won't come out unless you actually go into the nest yourself. Holding either the boulder or the fish will weigh you down so you can walk under the blue mushrooms.
The pill is behind a crack on the floor next to a suck nest that activates when it sees a piranha, so you will need to bring one with you. There's a piranha nest at the top of a diagonal passage on the way to the pill (C11). Stand near the suck nest and quickly get-store the piranha for an instant. The pill will be sucked toward the nest a short distance. Repeat the process, retreating when necessary, until the pill is in the nest. Collect the pill, and take the Coronium boulder back out with you.
 Fire
Fire
The fire immunity device is in the western caves below the Rune Portal, near the plasma gun. Above and to the east of the plasma gun tunnel is a hidden passage below a fire (D3), leading to a small cave with some red mushrooms. The device is on the other side of the mushrooms, next to a red imp nest (this cave is actually visible much earlier in the game, although you can't reach it - it's just through the wall from the main cavern).
Bring the flask through the Rune Portal and fill it from the well in the first tunnel. Hover beneath the hidden passage and throw the filled flask up through it to extinguish the fire. To get the device, simply boost over the mushrooms and wait to recover from the daze. The imps will casually shoot you, but don't seem overly aggressive, so there seems to be no need to kill them.
 Mushroom
The mushroom immunity pill is in the western caves below the Rune Portal, in the same windy cavern as the blaster. It is tucked into a side passage in the western wall, behind a push nest against a tile door (D9). On the other side of the tile door is the final easternmost windy cavern, also accessible via the passage at the top. At the bottom of the last cavern is a short passage containing a green slime nest, a red suck nest, and a red slime drip at the entrance (D10).
The intention here is obviously to use the green slimes to make Coronium boulders, and then destroy the tile door to release the mushroom immunity pill. At first glance this would seem impossible, because the red suck nest is placed right next to both ingredients, and a boulder would immediately cause it to activate.
However, the green slimes can be woken through the wall from the blaster cavern, and will readily tunnel down into the rhombus-shaped cave below the nest; feeding them a Coronium crystal without incident is then straightforward. Take the resulting yellow boulder past the imps and down into the last cavern. Hover against the eastern wall above the lower passage, drop the boulder and immediately fire the blaster to accelerate it down past the nest before it can be sucked in. (You can also go down against the western wall, then throw the boulder along the floor, but this feels like a visibility exploit). It is also possible to chase a slime out of the passage using the blaster, into the corner below the red slime drips, then convert it there.
Stand under the nest and carefully fire the blaster to push falling drips out of the passage and onto the boulder to transform it into Coronium. To get the boulder back out again, stand below the step facing west. Throw the boulder diagonally upwards, and simultaneously fire the blaster to accelerate it away from you. As before, the nest will briefly see it, but it should have enough momentum to get past the passage entrance before it can be sucked in. As soon as it clears the nest, boost up into the cavern and catch it before it falls back down. If you watch the wind particles, you can also time the throw so that an upwards gust works with you.
Use the boulders to destroy the tile door and free the mushroom pill. It will probably get blown into one of the caverns, so you may have to search for it.
 Cannon RCD
The large cannon in the Pericles (A2) can only be fired with a special RCD, identical in operation to the door/teleporter RCD. It is located in a vertical complex in the western caves below the Rune Portal, accessed via a tunnel below the first windy cavern.
Initially this tunnel is inaccessible; a suck nest is situated at the near end (D12), and a ceiling crack is obstructed by mushrooms at the other (D13). You will need the mushroom immunity pill to get through the crack. To get past the suck nest, go round past the gargoyle to the top-west corner of the first windy cavern (D11). Kill the invisible hoverballs (you can just use the pistol), and hit the switch in the alcove. This closes a tile door next to the suck nest, allowing you into the tunnel.
Boost past a large nest of red shroom-throwing imps, and through the first crack at the end. In this small room is the cyan (and invisible) frogman; he is hostile, and will hurt you on contact, but can easily be killed with the plasma gun. Squeeze through the second crack and descend the shaft. There are two nests of yellow maggots in the eastern wall; burn them with the blaster if necessary. The cannon RCD is blowing around in the windy cavern at the bottom of the shaft (D14).
There is nothing else of interest in this area, but standing at the end of the passage near the bottom will permit a glimpse of the fearsome red birds in a neighbouring cavern...
Locations
The caves
The world of Exile can be loosely split into several large-scale areas; gaining access to an area usually opens up a large region to explore and freely roam. These areas are as follows:
- The surface, the main cavern, the living quarters and the western Rune Portal cave (white)
- The Windy Passage, the caves at the bottom and the caves to the upper east (cyan)
- The caves to the far east and the flooded caves to the lower east (green)
- The western caves below the Rune Portal (yellow)
- Triax's lair and the lower western caves (orange)
These areas will most likely be visited in the order given. While it is possible in many cases to reach parts of them out of sequence, you might find such shortcuts difficult, and the areas more challenging to explore without the equipment and progress obtained in the previous sections. In many cases, some regions or rooms will remain inaccessible until later, and require revisiting once other tasks have been completed.
The surface and main cavern
Initially, you only have access to the surface and the two spaceships. To get into the caves, you must destroy the green door in the shaft below the Pericles under the turret (A4) - there's a grenade under a bush to the east, and another inside the Pericles (A2). Below the door, the passage splits. Down is a hoverball nest and a locked door (A5), but diagonally up and west leads to another shaft that opens into the main cavern.
The first major area is dominated by the main cavern and its adjoining rooms, mostly comprising the living quarters established by the original expedition. The living quarters are spread out vertically beneath the Pericles, on the east side of the main cavern, and include many rooms and passages. The lower west side of the main cavern is where the RCD, the flask and the pistol may be found. To the west of the entrance shaft, just below the surface, is a long passage leading to the cavern containing the Rune Portal (A12).
The Windy Passage and upper eastern caves
The Windy Passage is a vertical shaft to the east of the main cavern with a strong wind blowing up it. It cannot be reached directly from the main cavern; you must use a teleporter. Three different teleporters will bring you here; the left teleporter in the icer room (A6), the teleporter in the western passage (A11), and the teleporter in the jetpack booster room (A20). This area leads to the lab where robot Chatter may be found (B5), and a large network of caves on the eastern side containing the cyan/green key. The lab is secured behind a red door, and the eastern caves behind a cyan door, also opened by an invisible trigger in the passage above. A short distance down the Windy Passage is a small complex containing the second whistle (B14), and there is also a medium-sized area at the bottom containing the red/magenta key (B19).
You cannot fly directly down the Windy Passage, even using the jetpack booster; you must additionally hold a boulder to weigh yourself down. There is a boulder in the room with the cyan/green key (B10), but it's difficult to get out through the crack. A better option is another boulder two shafts over to the west, hidden in some red mushrooms (B12). The red mushrooms will put you into a temporary daze unless you have the mushroom immunity pill, so stand at the western end of the mushroom passage and shoot the boulder out the other side with the pistol. Once over the Windy Passage, stand upright away from the walls and boost downwards.
East of the Windy Passage and flooded caves
You can't easily reach this area via the Windy Passage, because the single tunnel halfway down is blocked by red mushrooms, and at the bottom there are two tile doors in the way. Instead, access is via the caves east of the top of the Windy Passage, below the cyan/green key. Follow the long passage between the green and yellow rock strata, through the crack above the red nest (B8). The wasp nest beyond can be killed with a grenade. The rock wall at the end of the passage (C1) is actually a movable block that can be pushed or shot around, and is invaluable for solving some of the puzzles below.
The network of caves behind the block is diverse. There are a couple of windy caverns, a large solitary friendly imp (the 'pink frogman') who eats maggots (C2), a pair of large green imps (the 'green frogmen') who won't attack you unless you try to get past their nest (C5), and many passages blocked by mushrooms. This area is where the radiation immunity pill can be found, as well as three Coronium boulders and a method for creating more.
The most interesting area, containing the Coronium and the radiation pill, can be reached from three different directions, all initially blocked. One way is guarded by a pair of fireball-spitting gargoyles (C4 and C7), another by the green frogmen (C5), and the final route by two underwater passages filled with both blue and red mushrooms.
Gargoyles
The gargoyles are linked; destroy one and the other will also die. The best way to kill a fireball gargoyle without the plasma gun or fire immunity device is to hammer it with the icer. The icer is not powerful enough on its own, but it will set off fireballs as they appear and the extra fire damage will destroy the gargoyle. The upper gargoyle can be killed from above, but this is difficult and tedious. A better method is to kill the lower gargoyle after going past the green frogmen; you can hover just below and get a good angle on it with the icer.
The green frogmen
The green frogmen will not leave the vicinity of their nest, will actively block you from passing them, and cause serious damage on contact. They can be killed with grenades, but an easier method is to push them down the passage with the icer and into the fire beyond. This will only work if you lie down and shoot slightly up at them, because they are too strong to be pushed when in contact with the ground - the icer shots propel them into the air and they cannot push back.
The most interesting solution is to get the block into that passage, and then persuade the pink frogman to move it for you, pushing the green frogmen into the fire; he is more than a match for both of them. This approach requires a little patience - push it yourself while the pink frogman is wandering around behind you, and he should see you and come to help. If you can get on top of him, he will 'carry' you, which seems to work best because if you end up behind him he gives up and turns around.
Interlude: Opening the Rune Portal
The Rune Portal is set into the floor of a large cavern to the west (A12). It blocks access to the final third of the map, including the plasma gun, the blaster, the fire and mushroom immunity pills, the cannon RCD, and of course Triax's lair
.This door will not open; it must be destroyed. The intended method is with a Coronium boulder explosion, requiring two Coronium boulders to be brought to the Portal from the bottom of the Windy Passage. Accomplishing this involves a lengthy sequence of events, starting in the caves above the radiation immunity pill (C6/C7/C8).
The boulders in this area can't easily be removed because there are red suck nests at every access point (B8/C3/C9) which activate upon sighting a Coronium boulder. Instead, this Coronium should be used to get the block (C1) past the bottom of the Windy Passage, where it can be used to help make more Coronium away from the red nests (B17/B19).
If you haven't already, bring the block past the green frogmen to the tile door leading to the red slime drips (C8), and push it into the water to float up against the wall. There are two Coronium boulders readily available; one up the vertical passage above the fire, next to a white bird nest (C7), and the other underwater near the radiation pill (C12). Put one on the block touching the door. Take the other to the passage above and drop it on the first to blow the door away. (You may find the pink frogman still wandering around near here; try to lose him somewhere, because if he sees you he will probably come and get in the way.)
The cave beyond the slime drips contains a nest of nominally friendly blue imps (C9). They throw Coronium crystals, but don't seem malicious because they injure each other as much as anything else. The other end of this cave leads to the area at the bottom of the Windy Passage, behind another tile door. This door must also be removed.
The third ready-made Coronium boulder is behind a push nest, at the end of the passage above the green frogmen (C6). The switch at the entrance opens the tile door and activates the nest. Remember once to the left of the nest, then once again up against the door. Hit the switch to open the door, then teleport and let the nest push you toward the boulder. The second tile door on the floor is operated by an invisible switch cell just in front of the ledge under the boulder, and when open lies just under the first door. Pick up the boulder, fly towards the nest over the second door, and throw the boulder such that it lands on the floor on the other side of the second door. Leave something (e.g. the RCD) by the ledge to keep the second door open, then teleport back to the other side of the nest, hitting the switch to close the first door and deactivate the nest. The second door should have pushed the boulder outside the first door, and it should now be sitting on the floor under the nest. Take it through the blue imp cave and leave it by the second tile door leading to the Windy Passage (C9).
Now you need to make a new Coronium boulder. The nest behind the third Coronium boulder contains three green slimes. Get a Coronium crystal from the imps, feed it to a slime, then extract the resulting yellow boulder in the same manner as before. Hold it under the red slime drips to convert it to Coronium, then use it to blow open the second tile door. As mentioned previously, boulders cannot be removed from this area because of the red suck nests (and on the far side of the blue imp cave, a push nest). To make more, you must use the complex to the west of the Windy Passage.
Bring the block through the imp cave, across the Windy Passage and into the water over the suck nest (B17). Push it down until the nest fires up, then squeeze through to the right while the block plugs the nest. Thrust down against the current, then throw a maggot into the top-right corner below the enclosed nest. It should burrow through to the nest, waking up the green slimes that live there; making some noise should then induce them to burrow down to you, and you can feed one a Coronium crystal to make a yellow boulder. Take the yellow boulder back up and push it through the gap onto the block. Hit the switch to close the door over the nest, and the block should float back up. Teleport out and collect the yellow boulder.
(Obtaining a yellow boulder in this way is by far the trickiest part; it will likely take many tries to wake up the slimes, and feeding them a crystal in the current is fiddly.)
Once you have extricated a yellow boulder, take it all the way to the west (B19), past the piranha nest, round past the switch to the crack at the top. Push it through the crack and under the red slime drips to convert it to Coronium. You will find the big fish useful here, as his presence will prevent the piranhas from emerging to disturb you. The switch opens the door below the red drips, but it will close again immediately; leave the RCD floating under the switch to continuously reopen it. Remember under the other door above the piranha nest. Throw a piranha through the crack, then teleport back to the lower door and wait for the suck nest to see the piranha. Once active, it will suck the piranha and Coronium boulder through the side door. The lower door is triggered by a switch cell on the slope to the right, and should get opened by the piranha and boulder on their way to the nest; you too will then get sucked in. Once the piranha is dead, the nest will deactivate. You can then trigger the lower door at your leisure and drop the boulder back through.
Do this twice, then float the boulders back up the Windy Passage and across to the Rune Portal via the teleporters.
Shortcuts
There are a couple of alternative ways to get through the Portal.
Bring a single regular boulder to the Portal. Remember position standing on the door. Stand so that the boulder is over the centre of the door, and fly upwards. When most of the way to the ceiling of the cavern, throw the boulder vertically upwards, teleport back to the door and immediately lie down. When the boulder returns and hits you, it should push you through the door without any ill effects. This is definitely a glitch, and 100% unintended.
Another option is to use grenades. At least six, packed together closely and activated as quickly as possible, seem to usually work. It's difficult to say if this is a glitch; after all, destructible game objects simply need to receive sufficient damage to be destroyed. Given the careful arrangement of the Coronium puzzles, it would seem to be at the very least unintended.
Western caves below the Rune Portal
Below the Rune Portal are a network of caves that contain the last of the weapons and other items that may be collected; the plasma gun, the blaster, the fire protection device, the mushroom immunity pill and the cannon RCD. There is also a single access point into the two areas comprising Triax's lair.
Broadly speaking, there are three main areas in the western caves. The first area is directly below and to the east of the entrance tunnel under the Rune Portal. This area contains the plasma gun and the fire protection device, as well as the first of four clawed robots. To the east of the entrance is a vertical shaft that leads down to a junction at the green/yellow rock interface. To the west of this junction is a windy cavern too strong to navigate; stay out of it because you will be pulled down to the bottom corner near two suck nests with no way back. To the east of the junction is a double cavern containing two nests of invisible birds (five in each), one at the entrance (D1) and the other above it on the ceiling (D4). On the far side of the double cavern is the plasma gun (D2) and the fire protection device (D3). Down from the junction takes you past the other side of the suck nests under the windy cavern, where a tunnel to the east (D12) leads to the third area, directly below the plasma gun cavern. The top of the first shaft connects to the top of the double cavern, via a homing fireball nest (D5).
The second area can be accessed to the west of the entrance tunnel below the Rune Portal. It is initially blocked by a fireball gargoyle (D6), which can be tediously killed, or killed with Chatter's help, but is much more easily bypassed once the fire protection device has been collected. The first shaft below the gargoyle leads into the top-west corner of the first windy cavern (D11), where a switch is guarded by a large nest of invisible hoverballs. A side passage above here leads to another, smaller vertical shaft, which drops into three more windy caverns lined up to the west, all below a single long passage. The first cavern is unremarkable, but the passage continuing west is guarded by the second clawed robot (D7). The second cavern contains the blaster and the mushroom immunity pill, and the third has a green slime nest behind a red suck nest and a red slime drip (D10). Between the second and third caverns is an imp nest with eight occupants; they throw red mushroom fruit which will incapacitate you until you have the mushroom immunity pill. At the bottom of the blaster cavern is a tunnel to the east that leads to Triax's lair (E1).
The third and final area is directly below the plasma gun cavern, and is accessed via the bottom of the vertical shaft to the east of the entrance tunnel, past the suck nest (D12). It is a vertical complex that contains only the cannon RCD (D14), although it is tantalisingly close to Triax's main lair. You will need to close a tile door to block off the suck nests before you can use the access tunnel, and you will need the mushroom immunity pill to get through the crack at the end of the tunnel.
Lower western caves and Triax's lair
The lower western caves can be reached via the tunnel at the bottom of the blaster cavern (E1). The mushroom immunity pill is ideally required to traverse the mushrooms. After the mushrooms, the tunnel splits (E2) - a passage leading diagonally downwards is guarded by a suck nest, and the horizontal tunnel continues to the east.
The horizontal tunnel leads to another junction (E8). Up leads to a teleporter in a T-shaped dead end (E7), which takes you back to the lab (B4). The shaft down leads via a small windy cavern to Triax's lair. At the first junction and immediately below the windy cavern (E9) are two nests containing the fearsome red birds. Just above the entrance to Triax's lair is an east-west passage with two tile doors blocking access to the west, and a yellow deathball turret opposite (E10). The passage continues to the east behind the turret, but there's nothing of interest there.
On the other side of the double tile door is a windy cavern, which also links to the diagonal passage with the suck nest from the access tunnel. Continuing west at the bottom of this cavern leads to a red imp nest and the blue/green key (E3) in another windy cavern. The tunnel continues to the west on the far side, but is blocked by a deathball turret (E4). However, another tunnel at the top of the second cavern allows the turret to be avoided. The third and final cavern to the west is also windy, and contains a small complex (E5) with a block, a fire, a teleporter and a switch (which deactivates the teleporter). The lower part of the cavern is flooded, leading to where the captives are held below a tile door and guarded by the green clawed robot (E6). The teleporter switch also unlocks the tile door.
All the other passages and caves in this area are unremarkable.
The lair entrance room (E11) contains a red suck nest with a Coronium boulder already in it. A tile door in the floor leads to a dogleg and a second tile door into a tall room with the red clawed robot. A crack to the east has an icer turret on the far side, above a short shaft that joins up with the bottom of the red robot's room via yet another tile door. Below here is a large empty room, and below that is Triax's maggot-making machine (E12) above a waterfall, and a small complex containing an automatic tile door that appears to regulate the water level (E13).
Miscellaneous
 Robot Chatter
Chatter is the fat blue robot visible through the wall at the top of the main cavern (B5). Judging by the presence of the starship thruster and the hidden teleporter, this area is supposed to be Spiegel's lab. Chatter is the only non-hostile robot in the game, and is controlled using two whistles. The first whistle activates him; he turns red, starts singing, and will follow you around, attacking anything hostile. The second whistle deactivates him; he will convert his fuel and produce a power pod.
Chatter is fuelled by Coronium crystals, which can be made by burning blue mushroom fruit. The crystals are radioactive, so holding them for any length of time will deal you damage (even through the protection suit). Fill your pockets with fruit, find a fire you can stand or hover next to, then quickly cycle through your pockets to produce the crystals and store again before you get too hurt. Alternatively, the blue imps behind the tile door to the east at the bottom of the Windy Passage (C9) will throw crystals around, which can easily be collected, or you can use the plasma gun. Radiation damage can be avoided if you have the radiation immunity pill.
The lab is accessed from the cavern at the top of the Windy Passage, through the red/magenta door under the turret (B3). The turret is easy to kill with the icer. Enter the lab, walk under the spaceship thruster and across the windy room (B4). As you enter the robot room, fly up to the ceiling to avoid taking fire from the other robot. Hold a grenade, post it into the crack over the teleporter, and throw it through. With luck, you can kill the hostile robot instantly, or (just as good) blow it into the teleporter. The teleporter leads to the lab door in front of the thruster, so if that happens, go back to the thruster and turn it on to fry the robot.
To fuel up Chatter, you must feed a Coronium crystal into him - simply throw one at him through the teleporter beam. Once fuelled, he can be activated, and will fly into the teleporter. Go meet him by the door. Once freed, Chatter can be used to fill up with power pods. To do this efficiently, you need a supply of blue mushrooms, a fire, and somewhere enclosed to get Chatter to emit power pods without having to chase them down.
Chatter is also a useful ally in the western caves, as well as Triax's lair. He fires bolts of lightning and will one-shot most enemies, the only disadvantage being that he can only fire horizontally. He can be used to kill the deathball turrets, the red birds, and the hardier imps. He will pester you until he sees enemies, so may require pushing around with the blaster or similar.
 Coronium
Coronium is a radioactive substance that will hurt you on contact, unless you have collected the radiation immunity pill. It may be found as crystals or boulders.
Coronium crystals are small, unstable glowing fragments that will explode after a short while (unless stored in a pocket). They may be obtained by burning blue mushroom fruit, or from the blue imps at the bottom of the Windy Passage. They are used to fuel up robot Chatter early in the game.
Coronium boulders are large and heavy - basically radioactive versions of the boulder used to descend the Windy Passage. There are three in the vicinity of the radiation immunity pill, but they cannot be removed from that area because of the strategically-placed red suck nests that activate as soon as they see one. Coronium boulders can also be created by feeding a crystal to a green slime, which turns it yellow and inert, and then placing it under a red slime drip.
If two pieces of Coronium make contact, a nuclear explosion occurs. Crystal-crystal explosions are slightly less powerful than grenades, but boulder-boulder explosions are the most destructive in the game, and are the only way to destroy certain tile doors.
 Nests
Nests
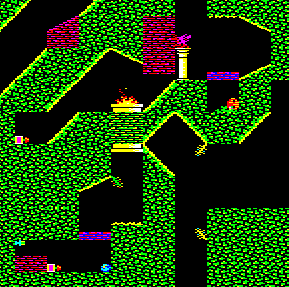
The map is littered with 'nests' - long bushes with a zig-zag stripe through them. Their type is denoted by their colour scheme. Most nests early in the game are green with a yellow stripe (see image), and many of these are literal nests with occupants that emerge when approached. Most of them, however, are empty, serving only to make you wary when you come across them.
All other nests fall into two categories. 'Suck' nests attract everything they see with irresistible force, and inflict damage on anything they capture. The only way to escape is by teleporting. Cyan/green suck nests are always active. Yellow/white only activate when a piranha is in sight, cyan/magenta a wasp, and green/green a maggot. Magenta/red only activate when a Coronium boulder or inert green slime (yellow boulder) is in sight. These nests are particularly problematic because boulders can only be destroyed by Coronium explosions, so the nest will remain active until the boulder's destruction can be arranged. They are typically located to make your life difficult when dealing with Coronium.
'Push' nests repel everything with unstoppable force. Once sighted, you will be propelled multiple screen widths at high speed, usually taking severe damage when colliding with scenery. Yellow/green push nests are always active. Yellow/cyan is only active when a piranha is in sight, red/magenta a Coronium boulder or inert green slime (yellow boulder), and blue/magenta is activated by a door switch.
These various behaviours are frequently used in puzzles, or to put obstacles in your way.
 Fluffy
Fluffy is a small pink purring creature in the upper eastern caves near the cyan key. He can be found at the end of a tunnel blocked by red mushrooms (B9), but will most likely come to find you if you make some noise. If he touches you, you will immediately be holding him, and anything you might be already holding will be dropped. He can be dropped or thrown, but will immediately come back to you.
He can be useful when trying to operate switches through cracks, but is not essential.
 Big fish
The big fish lives in a nest in the lower eastern caves (C10) near the radiation immunity pill. Holding him will weigh you down in much the same way as a boulder, allowing you to walk through blue mushrooms underwater. He eats piranhas, and his presence in the vicinity of a piranha nest will prevent them emerging, making him useful if you want to do something nearby.
 Clawed robots
There are four clawed robots: one guarding the plasma gun (magenta), one guarding the blaster (cyan), one guarding the captives (green) and one in Triax's lair (red). You are likely to meet them in increasing order of strength. They are armed with icers, can fly, and will teleport away when they receive damage. None of them are particularly deadly, but the fact that they can teleport away to escape death makes them difficult to kill. Furthermore, they will frequently materialise at your location to hassle you, making it difficult to complete puzzles and tasks.
Killing them requires dealing a lot of damage, quickly. The magenta and cyan robots can be killed with only the plasma gun fairly easily. Multiple shots from the cannon, or a Coronium explosion, seem to be the most reliable ways to kill the green and red robots in one go. The spaceship thruster in the lab is also useful; stand below the switch and wait for the robots to appear in front of it. In many cases they will appear behind you or below the thruster's line of sight, making the task all the more infuriating. The green and red robots require many repeated blasts to destroy by this method.
It is best to deal with the clawed robots as soon as you meet them, so you only have one of them hounding you at any given time.
 Teleporter destinations
Pistol room (A15) -> Rune Portal cavern (A13)
Icer room left (A6) -> Pericles cannon room (A2) / Windy Passage (B1)
Icer room right (A6) -> western passage (A11) / turret room near Windy Passage (B2)
Below entrance shaft (A8) -> jetpack booster room (A20)
Western passage (A11) -> Windy Passage top (near B3)
Pericles cannon room (A2) -> Perseus airlock (A1)
Rune Portal cavern (A13) -> pistol room (A15)
Jetpack booster room (A20) -> outside lab below turret (B3)
Lab robot room (B5) -> just inside lab (B3)
Lab hidden room (B4) -> Triax lair entrance (E11)
Windy Passage (B1) -> icer room left (A6)
Maggot machine (E12) -> captive cell cavern (near E5)
Captive cell cavern (E5) -> Triax lair entrance (E11)
Above Triax lair (E7) -> lab hidden room (B4)
Finishing the game
Most of the game tasks involve obtaining individual items, and the puzzles tend to be self-contained. There are two sections of the game that involve long complex sequences, the first being the destruction of the Rune Portal. The other sequence comes at the end of the game, and can be further separated into two sections; the invasion of Triax's domain, including preparations for the finale, and the endgame itself, which is a partly time-limited sprint to the finish.
There's really no chance of completing the game without having collected all the weapons, keys and other items listed above.
 Invading Triax
Venturing into Triax's realm begins via the long mushroom passage at the bottom of the blaster cavern (E1). Continue over the downwards diagonal passage halfway along (E2) to avoid a suck nest, until you come to a junction (E8). The first nest of red birds is here; they are very dangerous, but easily killed with the plasma gun or Chatter. The passage upwards from here takes you to a teleporter that leads back to the lab (E7).
Drop down past the bird nest and through a windy cavern. Below the windy cavern is the second red bird nest (E9); the short passage to the west is a good place to do battle with them. At the bottom of the shaft is the entrance room to Triax's lair (E11), and just above it is a yellow deathball turret in a side passage (E10). The red nest in the entrance has a Coronium boulder in it and is therefore active; drop a Coronium crystal down the shaft to clear it. Before killing the turret, use it to remove the two tile doors in the passage opposite, by standing in the diagonal passage just above it and dropping pistol bullets in front of them. Once the doors are destroyed, the turret can be killed using Chatter, or by dropping two Coronium boulders into the red suck nest just above it.
The entrance to the lair is now clear; however, you can go no further using conventional weapons. You need the cannon from the Pericles (A2) to go deeper - it fires yellow deathballs and is thus the most powerful weapon in the game. It is also non-portable, and must be pushed around. To get the cannon into the lair, you need the blue/green key to activate the teleporters in the Pericles and behind the tile door in the lab (B4). Go down the passage opposite the deathball turret and continue west across the cavern. The key is on the other side of a red imp nest (E3).
Return to the Pericles. Push the cannon into the teleporter, which leads to the Perseus' airlock (A1). Follow it, drop the cannon out of the ship and manoeuvre it under the Pericles and down the entrance shaft (A5). Now it needs to go into the teleporter immediately below the entrance shaft, which leads to the room adjoining the jetpack booster room. Getting it into this teleporter is easiest if you first drop the pink chest into the space just below, then put the cannon on top. Activating the switch for the door will push them both up, and the cannon will be neatly taken by the teleporter beam. Now you must get the cannon across the booster room (A20) into the teleporter that leads to the lab (B3). Before turning on the booster room teleporter, use the cannon to kill the deathball turret if you haven't already. Once in the lab, push it to the edge of the windy room and fire it across the gap to remove the door to the hidden teleporter. To get the cannon across the windy room, use the blaster to accelerate it up the ramp. If you fail, just push it into the other teleporter back to the door and try again.
The lab teleporter takes you directly to the lair entrance. The icer turret through the crack must now be destroyed; it is impervious even to the plasma gun, so use the cannon. You may be able to get the cannon level with the crack on the slope by the nest, or you can put it on top of the RCD right next to the crack. The turret won't fire at you while you're standing on the tile door. Once the turret is destroyed, throw something through the crack to hit the switch at the bottom, which opens the horizontal tile door and wakes up the nest of red imps above it. Kill the imps with the plasma gun and blow the tile door into the next room. If you're careful, you can drop the cannon next to the robot and kill it immediately before it wakes up. Otherwise, just chase it away, then blow the second vertical tile door.
The lower part of the lair is blocked by a final horizontal tile door. It is opened by the same switch that operates the first tile door, but closes again immediately with no chance to teleport back and get through. However, you can use the unlocked tile door in the passage below to push something into the switch, shooting the door to open it from a distance. The pink chest from the living quarters with the flask on top is ideal (bring the chest the same way as the cannon). In this way, you can hover above the final tile door, operate the switch then thrust down to push yourself and the cannon through when it opens.
Endgame
The lower area contains the maggot-making machine and the stolen destinator. Flying down by the waterfall will deactivate the machine's teleporter and you will quickly be overrun with maggots; the teleporter can be reactivated by firing the RCD through the crack. The destinator cannot be reached until the maggot machine is destroyed.
To destroy the maggot machine, you must flood it. At the bottom of the waterfall is a drain, with a tile door that continuously opens and closes to maintain the water level. The switch in the passage above is a manual control for the drain door. Destroy the tile door to the switch with the cannon; this may now be discarded. Position yourself under the switch, and whenever the drain door opens, close it again. Gradually the water level will rise. Once it rises past the switch, you must either constantly thrust downwards or hold something heavy to avoid hitting it at the wrong time. You may also have to fend off maggots from time to time, best done with the blaster.
Once the water level rises past the maggot machine, it will trigger an earthquake, destroying the machine. The machine must be onscreen for this to occur, so either scroll the view while operating the switch, or just stop and fly over once the water level is high enough. After this point, the earthquake will continue as the water level rises on its own, eventually stopping near the top of the main cavern. You can now access the alcove behind the machine and recover the destinator.
If you want to rescue the captives, there are some preparations that must be made before you trigger the earthquake. Firstly, you must clear all the hazards from the shaft above the lair entrance (E11), and activate the teleporter at the top (E7). Next, make sure the teleporters in the lab (B5), by the Windy Passage (B1) and the icer room (A6) are activated, and that the left-hand icer room teleporter is set to the Pericles. Get the captives out of their restraints and leave them under the overhang above the tile door (E6). Finally, take care of any remaining clawed robots that might still be alive.
Trigger the earthquake and use the maggot teleporter to get to the captives. The rising water will float the block out of the way and extinguish the fire, allowing you to push them into the teleporter to the lair (E5). Float them up the entrance shaft on the rising water and get them into the teleporter at the top (E7). Get them into the lab teleporter (B5), push them off the edge by the lab door (B3) and get them into the Windy Passage teleporter (B1). They will end up in the Pericles; one more teleporter and they're in the Perseus' airlock. You have a finite window of opportunity to get them into the Windy Passage teleporter before the water level reaches it - it's almost impossible once it's underwater.
This segment can be incredibly infuriating; save position frequently. It is pretty much impossible to move the captives vertically to any controllable extent, so if they miss the entrance to the first teleporter you've lost them. It is easy to get them trapped in dead ends; teleport behind them rather than trying to squeeze past. They are relatively hardy and can be moved around with pistol bullets, but don't use anything more powerful near them or you run the risk of killing them. This makes it even trickier, because Triax will be hassling you continuously, throwing grenades and shooting at you.
The destinator is bulky, and cannot be stored in a pocket, so you must carry it all the way back to the ship. Even if you don't want to rescue the captives, you should prepare the teleporters in the same way (see above) because it gives you an efficient clear run. If Triax gets to the destinator, he will take it from you and return it to the machine cave.
Once you enter the upper cabin of the Perseus holding the destinator, the ship's thrusters will fire up and it will begin to repeatedly orbit the planet. The game is now finished!
The novella is ambiguous about the identity of the captives. Baker disappeared with no clue as to his fate, Nash vanished below the Rune Portal with only a painful noise as evidence for his demise, and Swift was shot by Triax but not explicitly fatally. And although it is implied that Sprake killed himself to avoid becoming one of Triax's test subjects, it is not beyond the realms of possibility that Triax was able to stop him. Everybody else was definitely dead. It seems most likely that Baker and Swift are the survivors, but who knows?
Prior to the endgame, it is entirely feasible to move Chatter back to the Perseus, thus rescuing him as well. I have no idea if you get extra points for this. It is also easy to get Fluffy back to the ship, but almost impossible to ensure he stays there; he has a tendency to run after you and easily gets out by himself. I have not gone to the trouble of rescuing him, and I also have no idea if you get extra points for doing so.
 Rescuing the captives
 The Destinator

Final thoughts
Who are the captives?
No man left behind
![]()